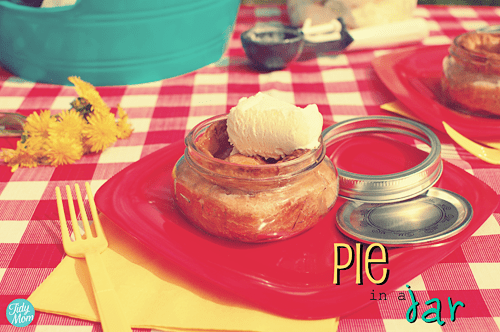
I came across the cutest thing in the whole world... Check out these Pie's in a Jar..I thought these would be perfect for gifts, family get together, or put in the freezer and enjoy whenever you want!

These are individual-sized pies made in little glass jars that can go straight from your freezer to your oven to your mouth. SO cute. These are just about the best little gift from the kitchen you could share with someone!
So check this out....
Pie in Jar
This is the type of jar you’ll need.

They’re half-pint jars, but short and squatty instead of tall and skinny ( ha ha just how i want to be.. ) here is the link to buy them on Amazon.
Step 1: Pie Dough
The first thing you’ll need is dough. You can use any pie dough you like or link to homemade crust That particular recipe will make 4 jars.Or if you’re really want to make it easy, even a store bought crust will do.
Step 2: Make a topper and line the jar
Roll out a small handful of dough. This is just for the tops of your pies, so eyeball about that much. Grab the ring part of your jar and use that as your cookie cutter. Brilliant, right? Cut out the tops and set aside
Roll out a small handful of dough. This is just for the tops of your pies, so eyeball about that much. Grab the ring part of your jar and use that as your cookie cutter. Brilliant, right? Cut out the tops and set aside
Use the rest of the dough to line the jars. (No, you do not need to grease them) The great part is that there’s no rolling required! Just take little pieces and press them in. Make sure it’s pressed all the way up to the top of the jar, or pretty close to it.

Step 3: Fill ‘er up
You’ll need about 1/2 C filling for each jar. You can use any filling your little pie-craving heart desires, even canned!
You’ll need about 1/2 C filling for each jar. You can use any filling your little pie-craving heart desires, even canned!
Here’s the basic recipe (for 4 pies)
2 C prepared fruit (pitted, diced, peeled, etc.)
2 T sugar- brown or white (use more or less depending on sweetness of fruit)
2 T flour- (again, more if your fruit is super juicy like cherries, less if it’s pretty dry)
1 T butter (divided between the pies)
Seasonings/flavorings- cinnamon, nutmeg, vanilla and almond extract, citrus zest etc)
When your filling is all combined, divide it between the jars and dot a pat of butter on top (about 1/4 T)

Step 4: Top it offMake sure your “lid” has a vent so steam can escape. You can use a knife to make a couple of slits or a tiny cookie cutter to make it decorative..
When your topper is ready, slip it onto the top of the pie. It will be large enough that the outside edge goes up the side of the dough-covered jar a bit, as show in the picture below. Then use your finger, or a fork (as seen above), to press the 2 pieces of dough together to seal. And nobody even think about mentioning the state of my fingernails.
Another option is to do a crumb topping. I put a basic crumb topping on my cherry pies and they were sooo yummy
**Crumb Topping (for 4-6 pies)
1/4C brown sugar
1/4 C flour
2 T oats
1/4 T cinnamon
3 T cold butter
Combine sugar, flour and cinnamon. Cut in butter. Add oats and stir to combine.

** Optional step here that I HIGHLY recommend: Brush pie tops with butter and sprinkle with sugar at this point. Yumminess highly intensified!
Step 5: Freeze ‘em!
Ready for this? When your pies are all done and topped, place metal lids back on and seal them tight
Then pop these little cuties in the freezer. There they will stay until you find yourself having an insatiable craving for home-baked goodness. You’ll be reaching for the crumbs at the bottom of the keebler box when suddenly your eyes will light up because you remember you have THESE sitting in your freezer.
Or when you have unexpected guests in need of impressing, or a friend needing to be cheered up, or it’s Thursday…I can think of a million reasons why one should have a constant supply of fresh pie in the freezer.
Step 6: Bake ‘em
Now first let me say that one of the biggest concerns from everyone is about the jars breaking in the oven. All I can say it that I’ve baked hundreds of these and never once has a jar broken. These are canning jars- they are designed to be boiled, pressure cooked, etc. So it’s different than putting any ol’ piece of glass in the oven. They bake just fine! But if you’re freaking out then my advice would be this: remove lids from jars and place jars on a baking sheet. Place baking sheet in a COLD oven. Then turn the oven to 375. That will give the jars a chance to warm up slowly as the oven preheats. If you’re really worried you can always let them sit at room temp for a bit first before putting them in a cold oven. Bake for about 50-60 minutes, or until the tops are golden brown and the middles are bubbly. If you’re baking them fresh and not frozen they take about 45 minutes.

Idea and Recipe found ourbestbites and greenweddingshoes I found a lot of links, recipes and stuff on the Internet..
Are these not the cutest things youve ever seen??
Thanks for Visiting, Esther


Love this idea...I'm gonna try it
ReplyDelete